

There are way too many skincare products and guides out there these days. That’s why we always get asked the same question: “What’s the right order?” It makes sense – especially with the transition of high school friends into new things they kind of know a little bit about, or celebrities who make their own products (which, let’s be honest, is an immediate purchase). And to top it off, there is just way too much info available in drugstores. The abundance of information can get overwhelming, but that doesn’t mean you should give up hope on finding good skin. So here’s our advice for when it all goes wrong:
– stop googling
– accept your skin as it is
– makeup isn’t the only option – a good mask can do wonders sometimes
– sleep deprivation is also not okay
So this is where we come in. Below, we broke down the proper skincare routine order plus the steps you can skip (!) and the best products for your specific skin type, from oily to sensitive to dry to acne-prone. Before we get started though, let’s talk about why the order of your skincare matters as well as a simple beginner routine that anyone can do regardless of their skin type.
The order in which you apply skincare is just as important as what products you’re using. It’s important to start with lighter moisturizers and then layer more intense ingredients on top. So, for example, if you wear a serum before moisturizing, the serum will be rendered ineffective. Similarly, if you wear moisturizer before oil-based serums, your moisturizer won’t be able to properly hydrate your skin. This can lead to dryness and irritation over time.
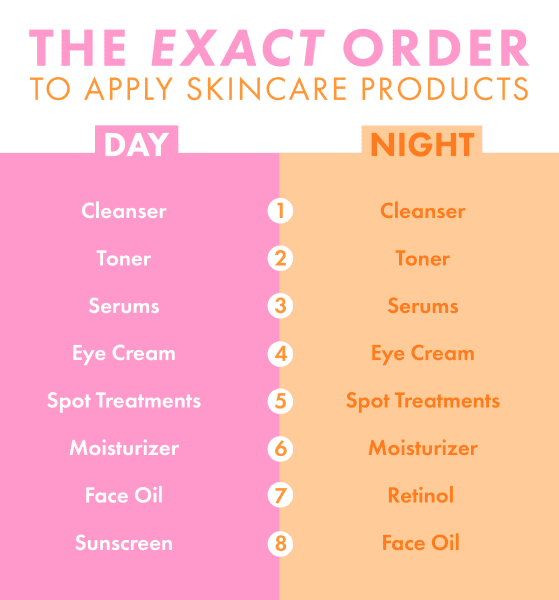
Wondering what a full skincare routine should look like in the proper order? This screenshot is a great little guide. Before you freak out at seeing 8-steps, take note of these three low-maintenance products (more on that below).
BTW: You don’t have to have a 8-step skincare routine. In fact, most people do better with fewer products. If you’re just starting out one product is enough!
Cleanser: a gentle, sulfate-free face wash
Moisturizer: a fragrance-free moisturizer that can be used twice daily
Sunscreen: a mineral or chemical sunscreen with SPF of 30 or higher (otherwise it will burn on the skin).
Now that you know how to care for your skin, add more products as needed.
Step 1: Cleanser
Apply: Morning and Night
Forget trying to do things halfway. You need to clean your skin before applying any products onto it. Therefore, you can’t use makeup wipes since they leave behind a layer of gunky residue that can break you out and irritate your face. So what should you do? First, you’ll need cleansing oil and a gentle, creamy cleanser to remove all your makeup without stripping your skin. Next, follow up with using an acne lotion or treatment or spot treatment for acne-prone skin. Then enjoy the peace and quiet of the comfortable silence!
Choosing the right cleanser for your skin type is crucial. Dry, acne-prone, or sensitive skin can benefit from the right type of cleanser.
Hydra + Oil-Gel Facial Cleanser – Rosemary CO2 Extract, Squalane, Blackcurrant Seed
Exfoliating Face Cleanser With Jojoba & Ginseng – 107ml/3.6oz
Step 2: Toner
Apply: Morning and Night
Face toners have either gentle and hydrating ingredients for dry and sensitive skin or chemicals for acne, oil, and bumps. Toners aren’t heavy; they’re just priming your face for better absorption! Acne-prone/oily skin: The best toner for acne prone and oily skin will be one filled with BHA (beta hydroxy acid, like salicylic acid) or AHA (alpha hydroxy acid, like glycolic acid). Dry skin/sensitive skin: Both dry skin and sensitive skin types do best with hydration products because they help replenish the water your body lost when you washed it and dried it.
Step 3: Serum
Apply: Morning and Night
In the skincare world, serums are often an essential component of your regimen. Serums are just shots of extremely concentrated nutrients, hydrators, and antioxidants that really amp up your skin health as soon as you apply them. Think of toners like a sip of beer and serums like a straight shot of tequila.
Although they are completely optional, serums can be a good first step in improving skin health and helping you level up your skincare routine.
For less oily skin, vitamin C serum does not need to be used every day. However for more oily skin, it is important to use the serum every day. Sometimes people with sensitive skin can apply it once a day but usually twice a day is better.
It’s a good idea to start your morning with a hydrating serum. If you’ve been using acne treatments or anti-aging products, which can be drying and irritating, the hyaluronic acid will help you prep your skin for this harsher world of skincare. Essentially, if your skin is craving more moisture than usual before adding a retinol (roacutane) treatment, then it’s time to hydrate with a hyaluronic acid product!
.
Step 4: Eye cream
Apply: Morning and/or Night
Eye creams are a lighter, thinner alternative to face moisturizers. So before you use any other products, apply an eye cream. An important note: Even though eye creams seem like the be-all and end-all of skincare (and anti-aging), they’re not necessary for most people. As long as you’re using moisturizer and sunscreen, your eye area is already getting the TLC it needs.
For the morning – go for an eye cream that has a rollerball applicator and contains ingredients like caffeine, which can help with under-eye bags.
For the night – regardless of your skin type, “most people” believe that their night cream needs to contain a certain ingredient to help with fine lines. However, as we know, the area around the eyes is delicate and can be easily irritated. Therefore, it is better to wear a less strong retinol to the whole face rather than spot treating only one area. This way, you will not irritate the delicate under-eye skin and leave your skin barrier healthy.
Detox Night Cream – Peptide-3, Echinacea & Reishi Extract – 40ml/1.35oz
Step 5: Spot treatment
Apply: Morning or Night
Ideally, spot treatments are best applied at night because your body is working hard to repair itself then. But if you’ve already applied a toner containing an acid or acne fighting agent to your skin and/or have plans to layer on a retinol, it would be preferable to apply the spot treatment in the morning so that you don’t irritate your skin with too much at once.
Regardless of when you apply your spot treatment, make sure to tap it on before moisturizing your skin so it can penetrate without interference.
The best way to combat hyperpigmentation—aka those pesky spots and scars that can last for months, if not years—is to use a daily SPF moisturizer with either hydroquinone (which works quickly but may irritate your skin if it’s sensitive) or niacinamide. Niacinamide is gentle on the skin and brightens over time, while hydroquinone should be used every 3 days at first. If you don’t experience any irritation after a week, you can increase the frequency to 2 or 3 times a week.
While there are different medications for acne, benzoyl peroxide is one of the most common. It kills bacteria that can cause whiteheads and aims to stop new breakouts before they start. Salicylic acid also works great on acne—it loosens oil from pimples and helps them heal.
If you decide to try both, use these steps:
-Apply a thin layer of benzoyl peroxide over your spot or zit, then wait for at least 60 seconds for it to dry in order to avoid making the treatment slide around on your skin during this time.
-To make sure benozoyl peroxide doesn’t bother your skin, moisturize all over before you apply the medication alone. This will prevent the product from getting wiped away by other products when you put them on afterward too.
-Apply a layer of moisturizer over everything if you want to seal in everything without the benozoyl peroxide moving around in some way during the day. If not, then make sure not to touch any other products unless you want them to move around too!
Step 6: Moisturizer
Apply: Morning and Night
To keep your skin barrier healthy and happy, you need to moisturize—even if your skin is oily or easily broken out or sad or scared. There’s a moisturizer for every skin type, so no matter what your concerns are, you can find the right product for your needs. Keep in mind that morning moisturizers should also offer sun protection (at least SPF 30), and let it sink in for 5-10 minutes before applying makeup at the end of your routine.
How to choose the right moisturizer based on your skin type:
Oily skin – Oily skin should look for lightweight moisturizers in either cream or gel-based formula to keep skin hydrated without feeling greasy.
Dry skin – The best dry-skin moisturizers are those that are filled with all the things your body naturally produces and needs more of, like hyaluronic acid, lipids, and proteins. Cream-based formulas will be your best friend morning and night.
Acne-prone skin – The right moisturizer for acne-prone skin will depend on whether or not your skin is dry (in which case, look for lightweight lotions) or oily (opt for gel-based formulas for morning, or cream formulas with salicylic acid at night).
Age-Repair + Intensive Moisturiser – White Tea & Phyto-Peptide 40ml/1.35oz
Step 7: Retinol
Apply: Night
A retinoid is any type of vitamin A derivate- such as Retinol. Basically, they work to speed up cell turnover, causing your body to churn out new, smoother skin over time. Four to six months of consistent use may be necessary for results, but don’t lose hope if you’re getting a great deal sooner; it does take some patience!
While it might take six months to see your wrinkles disappear, you’ll see more immediate results with retinoids. Retinoids trigger collagen production and cellular exfoliation, which means they’ll also prevent skin from aging by fading dark spots, smoothing scars, clearing pores, or preventing breakouts. In short, retinoids are the closest thing to magic that dermatologists have.
If you’re new to retinoids, don’t worry: they’re not as scary or drying as they sound. Start small and be patient when applying retinoids. Apply a pea-size drop to your face 2-3 times a week for the first few days, gradually building up to every night if your skin is too dry or uncomfortable.
Night creams containing retinoids alone won’t help skin look younger and more vibrant. Applying a moisturizer both before and after the retinoid treatment is just as important.
Step 8: Oil
Apply: Morning and/or Night
Face oils are called “occlusive” because they seal in ingredients and keep moisture from escaping from your skin. On its own, oil will not moisturize your skin as well – but when you layer it over top of a product, it can help increase your routine’s efficacy and leave skin soft and smooth. Just make sure to always apply oils at the end of your regimen; yes, the final step.
Oils can easily penetrate moisturizers, serums, and treatments, but no product can penetrate an oil, so they need to be applied last. Certain oils, like rose-hip and jojoba, can help counteract the effects of excess oil while marula and aloe oils will keep sensitive skin happy and healthy.
Step 9: Sunscreens
Apply: Morning
Yes, we told you oils go on last, but when you apply sunscreen, it’s actually the very end of your skincare routine. Why? Oils are still working to penetrate and treat your skin, which is why they would go last in your skincare routine. Sunscreen, on the other hand, isn’t trying to do anything but protect your skin and keep it from drying out. Basically, it’s not adding anything to your skin—it’s just protecting it from the outside world.
Don’t let your SPF 15 in your foundation or moisturizer be a hindrance to great skin. The absolute bare minimum SPF you need on your face is 30. Unless, you know, you’re okay with prematurely aging skin, worsened acne scars, and an increased risk of cancer.
Congratulations on mastering the world of skincare! You’re now, like, a skin guru for all intents and purposes. Now you can go ahead and get your face looking as glowy and flawless as ever.